
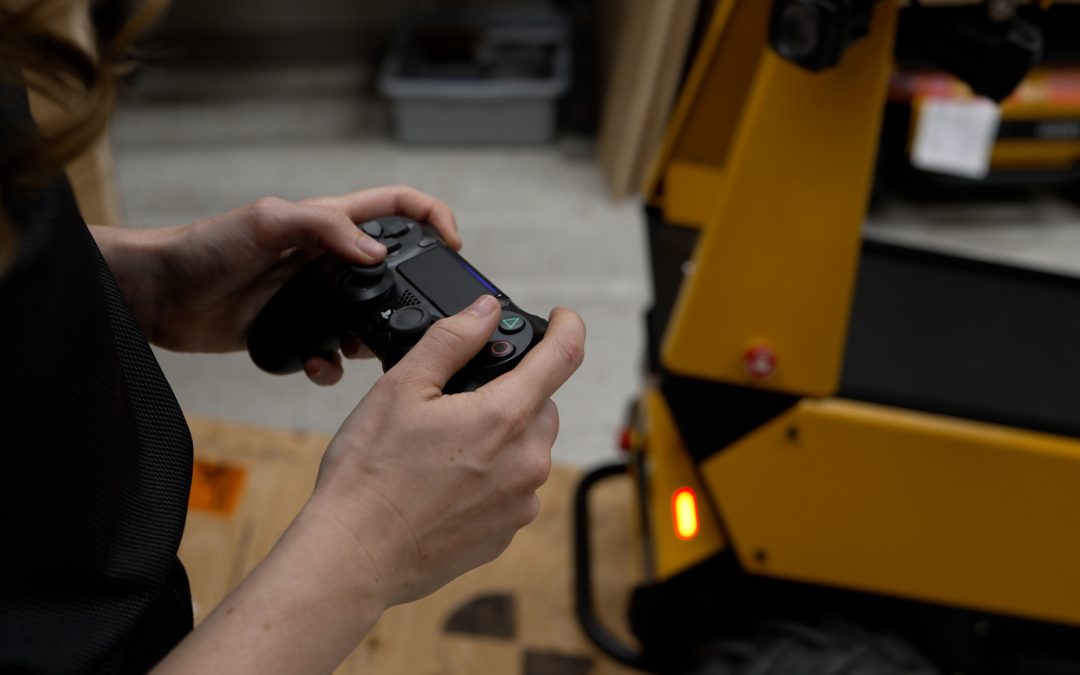
Before you can test drive your shiny new robot and move it to its new home, you’re going to need to connect it to the Bluetooth controller. If you’re wanting more detailed instructions than the user manual, or need to do some troubleshooting, this blog will walk you through those steps.
The pairing process is done through the robot’s onboard computer, so the first step is connecting to it via SSH. After you’ve logged in, you can pair the controller using one of two approaches. The first option uses a Python script that handles most of the pairing steps automatically. You’ll need to download this script from the internet before running it on the robot. The second option uses bluetoothctl, the Bluetooth management utility that comes built into most Linux systems. This method walks you through the pairing process directly from the command line. Both approaches work well—the choice mainly comes down to whether you prefer an automated script or a manual command-line setup. The steps for each method are outlined below.
Python Script
The Python script option is the simpler of the two methods, as the script handles MAC Address identification and assignment on your behalf. To begin first install the script by running the following command in a terminal when SSH’ed into the robot’s computer:
sudo apt-get install python3-ds4drv
Next, place the controller in pairing mode by pressing and holding the center button with the PlayStation® logo and the Share button, at the upper left corner of the touchpad.
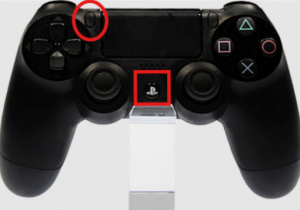
The LED light at the top of the controller should begin flashing white, rapidly.
The script can now be run using the command:
sudo ds4drv-pair
This script will scan for nearby Bluetooth devices, and pair automatically to the controller.
Bluetoothctl Command Line Utility
If the controller is not detected using the Python script method, or you have multiple robots with corresponding controllers, you can use the Bluetoothctl command line utility method.
Using the Bluetoothctl utility is slightly more involved, as it relies on you to provide the correct MAC address for the controller. The utility does assist with this process by providing plain text descriptions of the device associated with the MAC address seen.
To begin, run the Bluetoothctl command utility.
sudo bluetoothctlIf you receive an error regarding the command not being found (i.e. the package was not installed) it can be installed using:
sudo apt-get install bluezOnce within the utility, activate the Bluetooth scanning feature of the utility by switching the agent on using the commands:
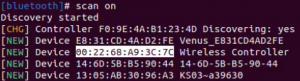
agent onscan onPlace the controller in pairing mode, by pressing and holding the center button with the PlayStation® logo and the Share button, at the upper left corner of the touchpad. The LED light at the top of the controller should begin flashing white, rapidly. The bluetooth scan will display the MAC addresses of nearby devices. Determine which MAC address corresponds to the controller, it will likely be labelled wireless controller. In the example below, the MAC address is 00:22:68:A9:3C:7C
With the MAC address copied, run these set of commands in quick succession:
scan offpair <MAC Address>trust <MAC Address>connect <MAC Address>
If the controller times out before the commands can be completed, simply restart the process by placing the controller in pairing mode again and activating the scanner. The overall process should appear as follows:
Driving your Robot
Now that the controller is paired, the robot can be driven using the controller. The controller allows you to drive at two different speeds. The speed mode is selected using the controller’s shoulder buttons, with the direction being provided using the left joystick.

Troubleshooting Controller and Drive Issues
In the event that the robot fails to drive with the controller, here are some common causes and how to address them.
Controller Will Not Pair to Computer
If the controller will not pair with the computer, please perform the following troubleshooting steps.
1. Try the alternative pairing method: If previously using the python pairing script, try swapping over to the Bluetoothctl utility, and vice versa.
2. Reset the controller: On the rear of the controller there is a small pinhole for a reset button. Using a paperclip, press and hold this button for 10 seconds.
3. Attempt to pair the controller to another Bluetooth enabled device: To verify that the controller’s Bluetooth chip is functioning as expected, try pairing it to another Bluetooth enabled device. This could be a smartphone or your laptop.
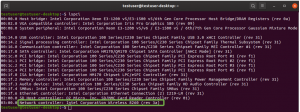
4. Verify the Bluetooth chipset for the robot’s onboard computer: To check that the robot’s onboard computer is detecting a chipset capable of connecting Bluetooth devices, run the command
lspci.
In the example output below, the Bluetooth chipset is identified as <dual-band controller>
5. Verify that the Bluetooth service is running: There is a chance that the Bluetooth service may have been deactivated. To check its status run the command:
sudo service bluetooth status
Controller is Paired, but Robot Will Not Drive
In the event the Bluetooth pairing method used is successful, but the robot will not respond to controller commands, try the following steps:
1. Verify that the controller is identified: Run the command
ls -l /dev/input
and see if the PS4 controller appears in the list of devices produced, it should be named either js0 or ps4.
2. Verify correct controller details in the robot.yaml file: Your robot uses its robot.yaml file to determine which controller is to be used as the drive controller. Check that this has been set to ps4 here
3. Check the controller inputs are reaching the onboard computer: Using the jstest toolkit, the controller’s own inputs can be displayed in a command terminal. To use jstest:
-
- Run the command:
sudo apt-get install jstest-gtk - To install jstest, run the command
jstest /dev/input/(device_name)in the example below /dev/input/ps4 is used.
- With the utility running, the controller’s inputs should be displayed in the terminal as shown in the example below.
- Run the command:
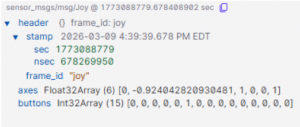
4. Check that ROS is receiving the controller inputs: By echoing the topic /joy_teleop/joy the controller inputs are displayed in two arrays, axes for the joysticks and buttons for the individual buttons. In the example output below, the shoulder button is held down to enable drive, and the robot is commanded to drive backwards:
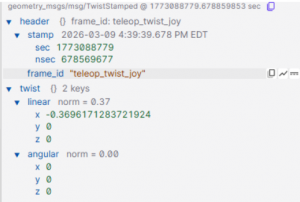
5. Check that ROS is translating the controller inputs to cmd_vel messages: By echoing the topic
/joy_teleop/cmd_vel the cmd_vel
messages generated by the controller inputs can be observed. The example below shows the resulting cmd_vel message from the controller given the inputs from the previous step:
Next Steps
To wrap up, you should now have been able to pair your Sony® Bluetooth controller with your Clearpath robot, gotten it driving around and navigate some basic troubleshooting scenarios. You’re now well on your way to getting your project started!
If you run into challenges or have questions specific to your setup, our support team is here to help.