

Getting your robot up and running isn’t just about powering it on—it’s about connecting it to a larger ecosystem. Our robotic platforms rely on wireless communication protocols to enable remote access to the onboard ROS environment, making development, monitoring, and support seamless from anywhere. And because our ROS 2 packages are continuously updated with new features and improvements, connecting your robot to the internet ensures you can take full advantage of the latest capabilities.
In this guide, we’ll walk through the complete process of bringing your robot online. You’ll start by accessing the onboard computer, then establish an interface with it. From there, you’ll update the Netplan YAML configuration file with your network details and apply the new settings. Finally, you’ll verify the internet connection to confirm everything is working as expected.
Each step is outlined in detail in the sections that follow, so you can move through the setup process with clarity and confidence.
Accessing the Onboard Computer
Each robot is shipped with an onboard computer that has been pre-configured with a fixed IP address of 192.168.131.1 on the ethernet interface. This allows for a known starting point for accessing the robot’s onboard computer. Using an ethernet cable, connect your computer to the robot’s onboard computer via the ethernet ports. The locations of the ethernet port for each of our robot models are listed below.
Husky A300
Open the read charger port to reveal the breakout ethernet port.
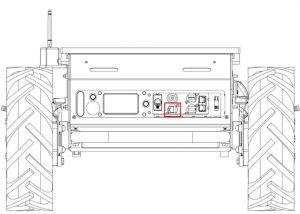
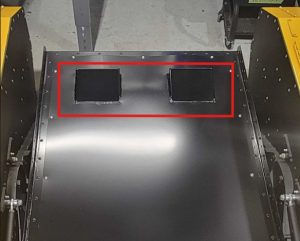
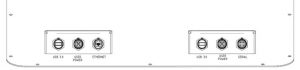
Warthog
On the top plate there are a pair of user breakout ports. These should include an ethernet port:
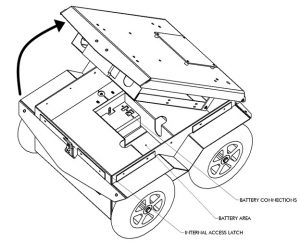
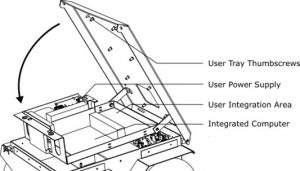
Jackal
Open the top plate of the Jackal. There should be a pair of thumbscrews along the top of the top plate. Undoing these will allow the computer tray to drop.
Dingo
Remove the yellow left-hand top-panel to access the onboard computer bay.
Dingo-O
Dingo-D
Ridgeback
Remove the yellow side panel to gain access to the onboard computer.
Interfacing with the Onboard Computer
With the two computers now connected, the next step is to open an SSH tunnel to access the network configuration files on the robot’s onboard computer.
Changing Network Adapter Settings
To ensure the SSH tunnel can be opened, the two computers must be told to communicate on the same network. As the robot’s computer has a fixed network address, your offboard computer address will need to be updated.
Windows 10/11
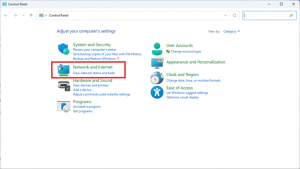
Open the Control Panel and select the Network and Internet panel:
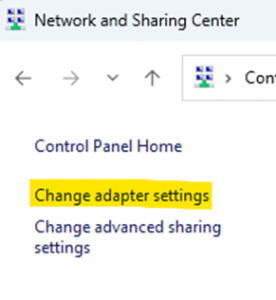
On the side panel select Change Adapter Settings:
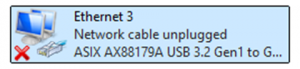
In the new window, select the Ethernet Network Adapter being used:
In the Properties window locate the IPv4 settings:
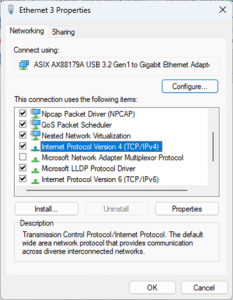
Set the IPv4 address settings to the following:
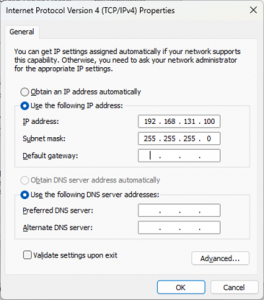
After applying these settings, you should be able to ping the robot’s onboard computer to verify the connection.
Next, open an SSH client, in this example PuTTY is used, and SSH using the IP address 192.168.131.1:
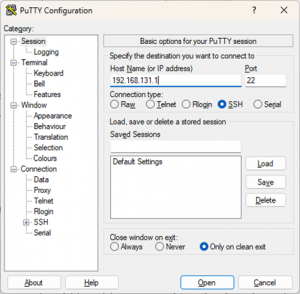
When prompted, use the following credentials to log onto the robot’s onboard computer:
Username: administrator
Password: clearpath
Linux
Open the Settings application and navigate to the Network tab on the side bar:
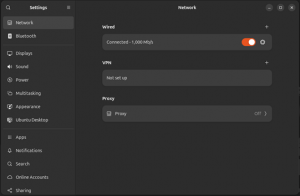
Select the gear icon next to the wired interface. In the new window select the IPv4 tab. Set the IPv4 method to Manual and apply the following settings:

After applying these settings, you should be able to ping the robot’s onboard computer to verify the connection.
Next, open a new terminal and begin an SSH session by running the command:
ssh administrator@192.168.131.1
When prompted enter the password: clearpath to login.
Updating the NetPlan YAML file
Our robots use netplan as the main network manager. Netplan relies on reading the network configuration settings written in YAML files stored in the /etc/netplan/ folder.
Once the SSH tunnel has been established, you should be able to access the netplan yaml files saved on the robot’s onboard computer.
For standard robot configurations, there will be two netplan yaml files in the /etc/netplan/ folder:
- 50-clearpath- standard.yaml – this is yaml file responsible for managing the wired network of the Clearpath robot. Please do not modify this file.
- 60-wireless.yaml – this is the yaml file responsible for the wireless network of the Clearpath robot. We will be working with this file in order to connect the robot to wi-fi.
CODE: 60-wireless.yaml File Template
network:
  wifis:
    # Replace WIRELESS_INTERFACE with the name of the wireless network device, e.g. wlan0 or wlp3s0
    # Fill in the SSID and PASSWORD fields as appropriate.  The password may be included as plain-text
    # or as a password hash.  To generate the hashed password, run
    #   echo -n 'WIFI_PASSWORD' | iconv -t UTF-16LE | openssl md4 -binary | xxd -p
    # If you have multiple wireless cards you may include a block for each device.
    # For more options, see https://netplan.io/reference/
    WIRELESS_INTERFACE:
      optional: true
      access-points:
        SSID_GOES_HERE:
          password: PASSWORD_GOES_HERE
      dhcp4: true
      dhcp4-overrides:
        send-hostname: true
NOTE: This template has been set up for standard WPA2 encrypted networks. If you have an enterprise network, or more complex network secruities, you will need to make arrangements with your organization’s IT department/Network administrator.
There are three components that must be changed prior to using the 60-wireless.yaml file.
WIRELESS_INTERFACE
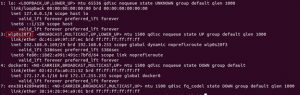
The WIRELESS_INTERFACE parameter found on line 9 indicates to netplan which wireless adapter should be used to connect to the specified network. To determine which wireless adapter is available: run the command ip a in a terminal. The resulting list should appear similar to the following:
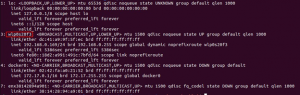
Locate the interface that begins with a w for wireless. Replace WIRELESS_INTERFACE with the adapter lister.
CODE: Wireless Interface for wlp020f3
network:
  wifis:
    # Replace WIRELESS_INTERFACE with the name of the wireless network device, e.g. wlan0 or wlp3s0
    # Fill in the SSID and PASSWORD fields as appropriate.  The password may be included as plain-text
    # or as a password hash.  To generate the hashed password, run
    #   echo -n 'WIFI_PASSWORD' | iconv -t UTF-16LE | openssl md4 -binary | xxd -p
    # If you have multiple wireless cards you may include a block for each device.
    # For more options, see https://netplan.io/reference/
    wlp020f3:
      optional: true
      access-points:
        SSID_GOES_HERE:
          password: PASSWORD_GOES_HERE
      dhcp4: true
      dhcp4-overrides:
        send-hostname: true
SSID and Password
The next two items that need to be modified are the SSID and password parameters on lines 12 and 13. For SSID replace this with the name of the network you are connecting to. For the password replace this with the network password.
For example, if connecting to a network named My_network with password password123, the file becomes:
CODE: SSID and Password
network:
  wifis:
    # Replace WIRELESS_INTERFACE with the name of the wireless network device, e.g. wlan0 or wlp3s0
    # Fill in the SSID and PASSWORD fields as appropriate.  The password may be included as plain-text
    # or as a password hash.  To generate the hashed password, run
    #   echo -n 'WIFI_PASSWORD' | iconv -t UTF-16LE | openssl md4 -binary | xxd -p
    # If you have multiple wireless cards you may include a block for each device.
    # For more options, see https://netplan.io/reference/
    wlp020f3:
      optional: true
      access-points:
        My_network:
          password: password123
      dhcp4: true
      dhcp4-overrides:
        send-hostname: true
After saving this new netplan yaml file, apply it with the following commands:
sudo netplan --debug generate
sudo netplan --debug apply
Verifying Connection
With the necessary setup complete, the final step is to verify the internet connection. You do so by simply pinging www.google.com or it’s DNS server addressed at 8.8.8.8.
Troubleshooting
If the ping test fails here are some common troubleshooting steps you can perform to determine where the break is occurring.
Robot to Router Connection
Run the command:
ip aObserve the output and locate the wireless interface that was used in the 60-wireless.yaml file:
Check that it has been given a valid IPv4 address labelled inet. If there is no IP address listed:
- Double check the 60-wireless.yaml file for any typos in the SSID, password, or wireless interface. Also, double check the whitespace of the file, the netplan yaml files are whitespace sensitive, an errant tab or space can affect the outcome.
- Verify network security, there may be additional network security applied to the network. Contact your organization’s IT team/Network Administrator to verify if this is the case. These could include, but are not limited to:
- MAC address whitelisting
- DHCP validation
- Limited IP address availability
Router to Internet Connection
If a valid IP address appears, the robot has successfully connected to the router and was able to lease an IP address. This would indicate that the break in connection is between the network and the ISP. Contact your organization’s IT team/Network Administrator to verify if this is the case.
Bringing your robot online is a key step in unlocking its full potential—from remote access to the onboard ROS environment to receiving the latest ROS 2 updates and feature enhancements. With a stable internet connection in place, your platform is ready to stay current, secure, and fully supported.
If you have any questions during setup or run into issues along the way, our support team is here to help. We’re committed to making sure your robot is connected and performing at its best.