NOTE: As of May 2016, this tutorial is out-of-date. Click here to view an up-to-date version of this tutorial. All our ROS, PR2 and Clearpath Robot tutorials are available on our Knowledge Base.
Before getting started, we recommend to either complete or review the Publisher/Subscriber tutorial located here. These tutorials will help with understanding the overall structure and power of the subscriber – publisher system in place in ROS. Though a quick overview of the sub/pub process is that if you need to exchange information in ROS the way to do so is to look for what information is “advertised” by a publisher and subscribe to that stream of data. Data is broadcasted or requested over a “topic”. Topics are made by a subscriber and can be filled by a publisher or vice versa. The topics that are important right now are the /base_scan/scan topic and the /cmd_vel topic. A great starting point to gain a basic understanding is here.
Launch Gazebo with an empty world
The simulation environment for ROS is Gazebo. There are many models that exist that are able to be loaded into the Gazebo environment. These models (for example a Husky with a laser scanner) will publish and listen for specific topics just as if the system was running on the actual robot. To get this system running, the user must launch Gazebo with an empty world then also launch a model of the desired robot with the requisite sensors. In this case, an empty world and Husky robot with a LIDAR will be used.
Attach a simulated LIDAR
The first step is to install and then modify the existing Husky robot simulation file such that it has a LIDAR attached. This can be done by modifying the urdf file of the Husky, which can be located using:
$ sudo apt-get install ros-hydro-husky-desktop
$ roscd husky_description
$ cd urdf
$ sudo vim base.urdf.xacro
Move to the bottom of the file and insert the following section of code before </robot>. WARNING: This code will be removed if you update ROS, you will have to replace it if that happens.
<!-- This adds the laser macro, including the scan for gazebo and link name -->
<include filename="$(find pr2_description)/urdf/sensors/hokuyo_lx30_laser.urdf.xacro" /><xacro:hokuyo_lx30_laser_v0 name="laser_scan" parent="base" ros_topic="base_scan/scan" update_rate="20" min_angle="-1.57" max_angle="1.57" > <origin xyz="${0.4 - 0.01 - 0.04} 0 0.3" rpy="0 0 0" /> </xacro:hokuyo_lx30_laser_v0> <!-- This adds a visual box to allow us to see the Hokuyo in rviz/gazebo --> <joint name="laser_joint" type="fixed"> <origin xyz="${0.4 - 0.01 - 0.04} 0 0.3" rpy="0 0 0" /> <parent link="base_link" /> <child link="laser_link"/> </joint> <link name="laser_link"> <inertial> <mass value="0.01" /> <origin xyz="0 0 0" /> <inertia ixx="0.001" ixy="0.0" ixz="0.0" iyy="0.001" iyz="0.0" izz="0.001" /> </inertial> <visual> <origin xyz="0 0 0" rpy="0 0 0"/> <geometry> <box size="0.05 0.05 0.1" /> </geometry> </visual> <collision> <origin xyz="0 0 0" rpy="0 0 0"/> <geometry> <box size="0.05 0.05 0.1" /> </geometry> </collision> </link>
This should allow the robot to have the necessary sensor.
Now to put it all together
To open up the empty world and Husky robot, execute the following:
$ roslaunch gazebo_worlds empty_world.launch
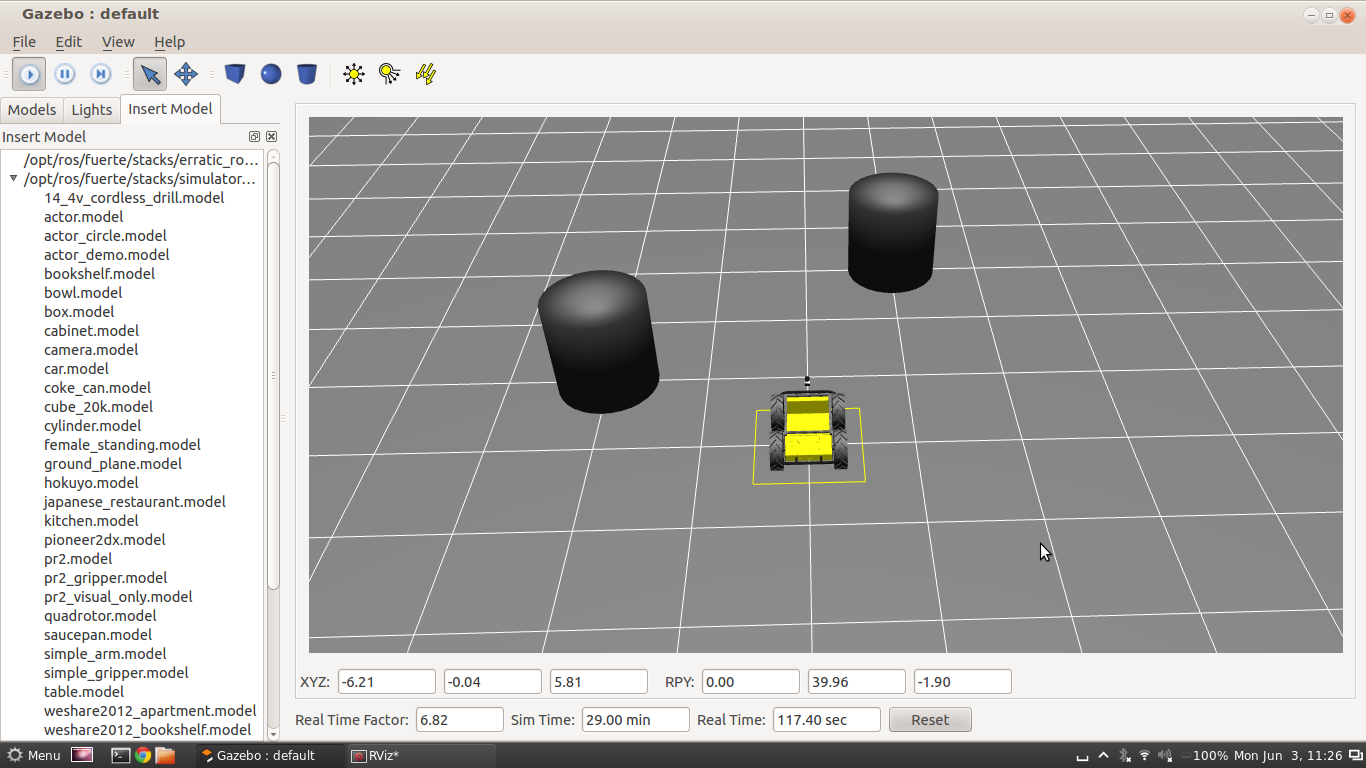
A window similar to the one below will appear on the screen.

Next in a separate terminal tab or window execute:
$ roslaunch husky_gazebo base.urdf.gazebo.launch
A husky robot with a grey box near the front should appear, provided the LIDAR was added correctly.

You can then execute the following command in another terminal to see the available topics:
$ rostopic list
The aforementioned topics should be listed, such as base_scan/scan.
Obstacles can be added in Gazebo by selecting the Insert Model tab and adding the desired objects to the scene. The data generated from the laser scanner will be published and can be shown using the rviz tool that is part of ROS. A tutorials can be found at http://www.ros.org/wiki/rviz/Tutorials
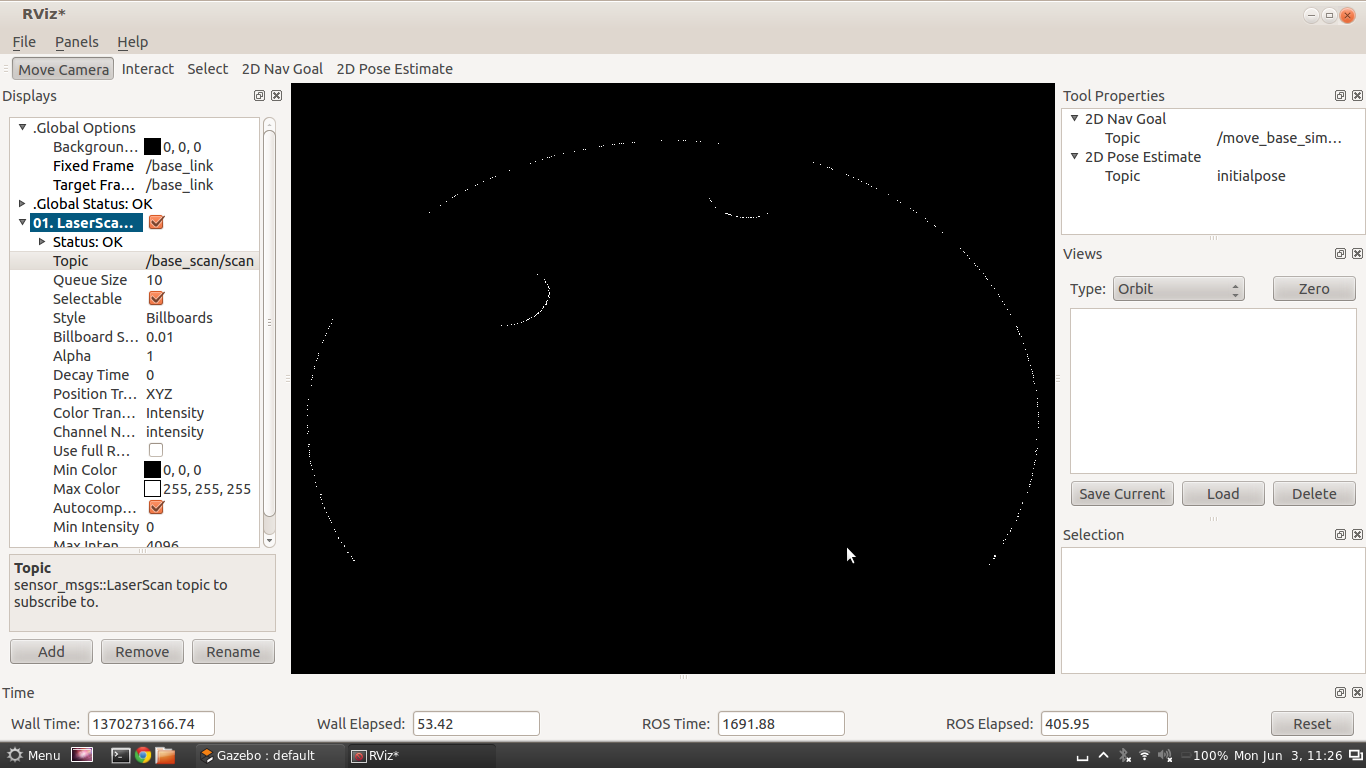
The image below is a view of what the laser-scan is seeing in the program rviz. It can be started from the terminal by running:
$ rosrun rviz rviz
To show the laser scanner data, click “Add” in the bottom left side and select the LaserScan option. In the left hand bar it should appear. Below the status of the part there should be a field where the topic to listen to is selected. Select the laser-scan you wish and it ought to be displayed.