Since we practically live in the Robot Operating System (ROS), we thought it was time to share some tips on how to get started with ROS. We’ll answer questions like where do I begin? How do I get started? What terminology should I brush up on? Keep an eye out for this ongoing ROS 101 blog series that will provide you with a top to bottom view of ROS that will focus on introducing basic concepts simply, cleanly and at a reasonable pace. This guide is meant as a groundwork for new users, which can then be used to jump into in-depth data at wiki.ros.org. If you are totally unfamiliar with ROS, Linux, or both, this is the place for you!
The ROS Cheat Sheet
This ROS Cheat Sheet is filled with tips and tricks to help you get started and to continue using once you’re a true ROS user. This version is written for ROS Melodic. Download the ROS Cheat Sheet here.
What is ROS?
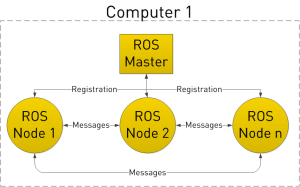
ROS (Robot Operating System) is a BSD-licensed system for controlling robotic components from a PC. A ROS system is comprised of a number of independent nodes, each of which communicates with the other nodes using a publish/subscribe messaging model. For example, a particular sensor’s driver might be implemented as a node, which publishes sensor data in a stream of messages. These messages could be consumed by any number of other nodes, including filters, loggers, and also higher-level systems such as guidance, pathfinding, etc.
Why ROS?
Note that nodes in ROS do not have to be on the same system (multiple computers) or even of the same architecture! You could have a Arduino publishing messages, a laptop subscribing to them, and an Android phone driving motors. This makes ROS really flexible and adaptable to the needs of the user. ROS is also open source, maintained by many people.
General Concepts
Let’s look at the ROS system from a very high level view. No need to worry how any of the following works, we will cover that later.
ROS starts with the ROS Master. The Master allows all other ROS pieces of software (Nodes) to find and talk to each other. That way, we do not have to ever specifically state “Send this sensor data to that computer at 127.0.0.1. We can simply tell Node 1 to send messages to Node 2.
How do Nodes do this? By publishing and subscribing to Topics.
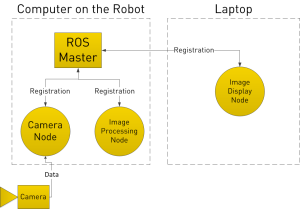
Let’s say we have a camera on our Robot. We want to be able to see the images from the camera, both on the Robot itself, and on another laptop.
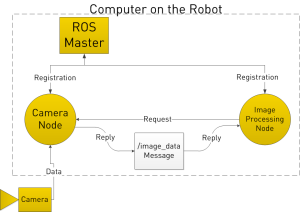
In our example, we have a Camera Node that takes care of communication with the camera, a Image Processing Node on the robot that process image data, and a Image Display Node that displays images on a screen. To start with, all Nodes have registered with the Master. Think of the Master as a lookup table where all the nodes go to find where exactly to send messages.
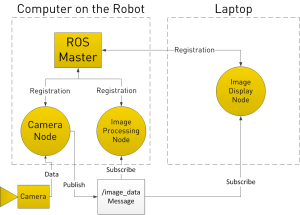
In registering with the ROS Master, the Camera Node states that it will Publish a Topic called /image_data (for example). Both of the other Nodes register that they are Subscribed to the Topic /image_data.
Thus, once the Camera Node receives some data from the Camera, it sends the /image_data message directly to the other two nodes. (Through what is essentially TCP/IP)
Now you may be thinking, what if I want the Image Processing Node to request data from the Camera Node at a specific time? To do this, ROS implements Services.
A Node can register a specific service with the ROS Master, just as it registers its messages. In the below example, the Image Processing Node first requests /image_data, the Camera Node gathers data from the Camera, and then sends the reply.
Looking for other Clearpath tutorials? Click here for more ROS tutorials, or visit our Knowledge Base to browse all of our tutorials.


How do you put ROS master on the embedded platform? What if I do not want to use a computer? How much processing power would a ROS master need in general assuming I have 10 nodes running?
ROS is not an actual operating system.The nodes are run on the embedded system and interaction between different nodes on different networks can be done using ROS
Robot Operating System (ROS) is not an actual operating system, but a framework and set of tools that provide the functionality. Its usefulness is not limited to robots, but the majority of tools provided are focused on working with peripheral hardware.
There is no risk of side effects if you decide to turn it off. Our recommendation is that if your system is running well, leave it on. If you have issues with high HDD usage, high RAM usage, or degraded performance during RAM-heavy activities, then try turning it off and see if it helps.
Thanks for sharing some valuable tips on how to get started with a Robot OS. This is really informative one.
well programming to develop robots is next generation should be required complex work done and creating smart system I m very pleased to read this article and wanted to say that I have really enjoyed browsing your blog posts. Use full information up to date knowledge
Robots are usually machines controlled by a computer program or electronic circuitry. They may be directly controlled by humans. They may be designed to look like humans, in which case their behaviour may suggest intelligence or thought. Most robots do a specific job, and they do not always look like humans.
There are a number of software or tools out there that you can use to connect your sales and marketing planning. It depends on what all activities you are looking out to plan through it. sales and purchase management software
Wow I like robot operating system..I want to learn it. Thanks for sharing this valuable information.
Great article which sheds basic info on robotic os. Thanks for sharing
Looking for VAT ERP Software Solution in Dubai, UAE? We are among best ERP Software Companies in Dubai, UAE holding strong reputation in development of Web based VAT Accounting Software, CRM, HR Software.Trading Software Dubai
Web desk ERP is a dynamic and progressive company with a clear objective – to provide our clients with innovative and cost-effective business solutions through the efficient deployment and integration of information technology.Approval Software in UAE
Awesome post. I’m a normal visitor of your website and appreciate you taking the time to maintain the excellent site. I’ll be a frequent visitor for a really long time. Data Recovery services
You mentioned article was awesome, I read it I got such the best information from your site. Your site is amazing and giving the best important posts they really useful to all. mobile repair Dubai I am impressed with this site. Thank you
Hello I am so delighted I located your blog, I really located you by mistake, while I was watching on Google for something else, Anyways I am here now and could just like to say thank for a tremendous post and a all-round entertaining website. Please do keep up the great work.
This is a very informative one. Thanks for the valuable information. Highly impressed! Thank you.
Fareskhalifa is one of the best online travel agencies that offer affordable services for flight booking, hotel booking, car rental, and more. Fareskhaifa offers the best discounts you have ever come across as well as once you book cheap flight tickets, you will be given rewards that you can avail yourself of while booking your next flight ticket.
Excellent shares robotic system ROS concept
Thanks for the wonderful post, It’s goes a long way to help improve much in terms of projects i have in the coming months.
So, what exactly does an IT firm do? IT offers consulting, computer support, resolving current issues, and social media outreach
Valuable content, thanks for sharing such a beautiful piece of information. Here you can see the latest news and informative tips.
Your article is detailed, thanks to it I solved the problem I am entangled. I will regularly follow your writers and visit this site daily.
I hope you will post more Updates.
Thanks for the post
In this era we are surrounded by different technological amenities with all businesses having an online presence, you need secure and trustworthy cybersecurity solutions to keep it safe from any potential security threat.
Breeze End Technology, LLC offer reliable and top-notch cybersecurity to help organizations fight cyber risks. We cover all aspects of cybersecurity to provide you with a complete range of services as our team is constantly on the verge of the latest advancements.
We work with a comprehensive approach to keep your business safe from cyber threats. From cybersecurity program strategy to risk assessment, threat intelligence to security monitoring services, we have got a complete package for you. Our highly qualified and competent team knows how to fill in cybersecurity gaps to provide a clear road map for a powerful and strong cybersecurity system.
PEmpowering you by Reliable Cyber Security Solutions
thanks for this lovely wonderful post I love to know more about robot OS.
Thanks for the nice blog. It was very useful to me. I’m happy I found this blog. Thank you for sharing with us, too always learn something new from your post. I love to learn new from robot technology. Contact For iPhone Repair Dubai Services.
Awesome blog. I love to see and learn from robot technology. Hi there! I just would like to give you a big thumbs up for the great information you have here on this post. I am returning to your website for more soon. For More SKSE64 NOT WORKING PROBLEM is existed.
I truly thank you for the significant data on this incredible subject and anticipate more awesome posts. You’re the best to enjoy this excellent article with me. I am welcoming it all that much! Anticipating another awesome article. Good fortunes to the creator! All the best! Any issues regarding the uTorrent Not Responding is occurs.
Thanks for the nice blog. It was very useful to me. I’m happy I found this blog. Thank you for sharing with us, too always learn something new from your post. Our article is detailed, thanks to it I solved the problem I am entangled with. Read more about Speak to someone at Qatar Airways
Nice post!!! I’m a regular visitor of your website.
It’s truly a great and helpful piece of information. I’m happy that you simply shared this helpful info with us. Please keep us informed like this. Thanks for sharing.
Nice Post…Keep it up mate..