Getting Started
This section outlines how to set up your OutdoorNav system for some preliminary testing with the OutdoorNav Software on a UGV. For details on simulation, refer to Simulation.
These instructions assume that the UGV is already powered ON.
Connecting to Web UI
The web server for the UI typically runs on a computer on the UGV. As such, it is necessary for the networking setup on the UGV to be complete and for all related hardware to be powered on.
Note
In the case of Clearpath Robotics OutdoorNav Hardware, ensure that the Base Station is powered ON.
Follow the steps below to connect to the Web UI.
Connect your computer to the same network as the UGV.
Note
For Clearpath Robotics OutdoorNav Hardware, use the Base Station network. Enter the network list and find the wireless network related for your UGV. The SSID of the network is located in the Robosmith manual that was shipped with your UGV.
Open an Internet browser (preferably Chrome) on your computer.
Enter the UGV’s IP address followed by a forward slash in the search bar. A bookmark of this page can also be created for future sessions.
Note
For Clearpath Robotics OutdoorNav Hardware, this will be 192.168.131.1/ for normal use cases and 192.168.131.100/ for systems with a separate OutdoorNav computer.
The above steps will open the Web UI, which will allow the user to operate the UGV in Manual Mode (teleoperation) or in Autonomous Mode (missions).
Loading Map Tiles
The Web UI does not cache map tiles on the browser; therefore, the user will need to ensure their computer has a connection to an Internet source to load the map tiles. There are a several options to achieve this:
If the system includes a Base Station that is connected to the Internet, you will be able to access the Internet and therefore map tiles over the base station network without needing any further updates.
Connect your phone via USB to your computer (or tablet) and enable USB tethering on your phone to share the Internet from your phone.
Switch your computer (or tablet) to a network that is connected to the Internet, zoom in/out of the map to load the tiles then switch back to the original network.
Survey Base Station
If your system includes a Base Station, it must be surveyed using the steps below to be able to to operate the UGV autonomously.
Access the Menu → Settings → Map.
In the “Survey Base Station” section, click the Start button begin the surveying process.
During surveying, the Status Indicator will turn orange  and return to its green default state when surveying is done
  .
Only then should the UGV be sent on autonomous missions. The entire surveying will take
approximately 5 minutes. A feedback bar will also be displayed showing the current progress
of the surveying. Do not refresh the page or you will lose the feedback bar.
.
Only then should the UGV be sent on autonomous missions. The entire surveying will take
approximately 5 minutes. A feedback bar will also be displayed showing the current progress
of the surveying. Do not refresh the page or you will lose the feedback bar.
Warning
For an accurate survey, do NOT move the Base Station during this process. After the surveying has completed, the Base Station should not be moved unless required. If you need to move the Base Station or it has been moved accidentally, the surveying process needs to be run again.
Set Datum
Before operating the UGV autonomously, the user will need to set the datum, which is the reference point in the world coordinate frame.
Access the Menu Menu → Settings → Map.
In the Change Datum section, enter the latitude and longitude of a location close to the test site (within 10km). Decimal lat/lon are expected. Use a minimum of 6 decimal places.
Click Set Datum button to set the new datum.
The user should see the blue dot (datum) and the blue arrow (UGV) move to the test site. If the GPS status indicators are green, the UGV should be at its correct position on the map as well as facing in the correct direction.
Set Dock Location
Note
If the Clearpath Robotics autonomous docking package has been purchased, follow these instructions to set up the dock location. Otherwise, this section can be skipped.
Warning
Keep the area around the dock free of objects and people. There is no obstacle detection between the pre-docking point and the dock; similarly, there is no obstacle detection during the undocking operation.
Autocharge Dock
Before being able to dock the UGV autonomously, set up the dock location. Follow these steps to position the UGV in its correct position and orientation.
Power ON the UGV and computer and wait for the system to finish booting. For example, on the Clearpath Robotics Husky, booting is complete when the COMM indicator turns green.
Start by manually driving the UGV to the dock target and align it as straight and centered as possible so that it begins charging. The Wibotic receiver on the UGV should be centered longitudinally and laterally with the circle on the Wibotic transmitter (TR-300).
Measure a distance of 2 meters from the center panel of the dock target (see figure below). Lock a measuring tape to a distance of 2 meters and then lay it down beside the charge dock so that one end is even with the center panel.
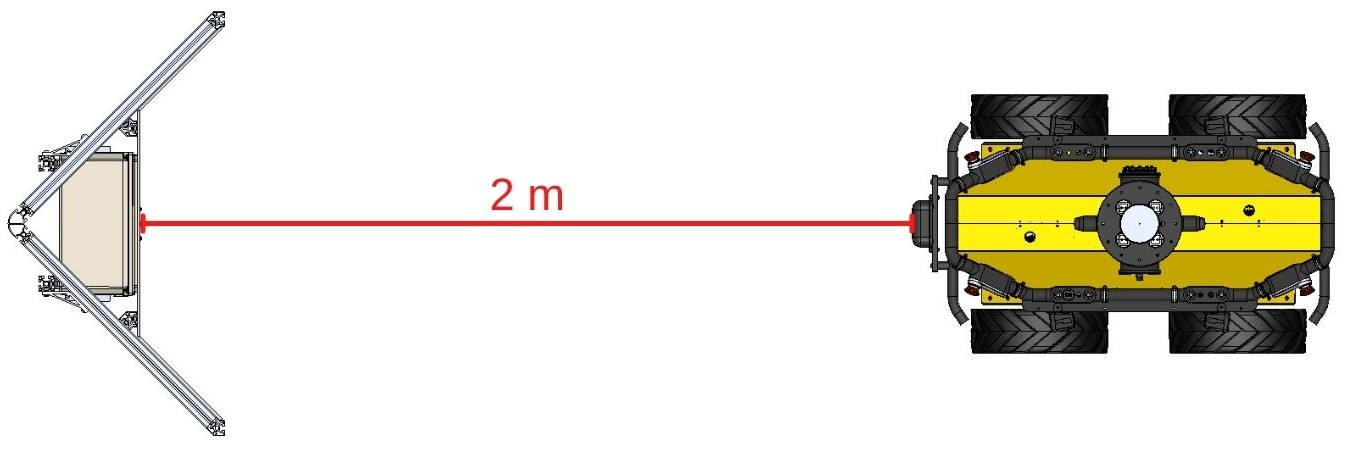
Dock target location setup, using Husky as the reference UGV
Reduce the joystick scale on the Web UI to 20%.
Reverse the UGV slowly so that its heading remains as perpendicular as possible to the center panel. Reverse the UGV until the front of the UGV (furthest front part) is 2 meters from the center panel (see figure above for a visual description of what the final position should look like). Centimeter precision is expected and the user should aim to get this front piece within 1-2 centimeters of the measured position (step 3).
Let the UGV sit in this position for 2 minutes to acquire an RTK GPS fix. The POS (position) and DIR (heading) GPS status indicators on the UI should read as follows:
.If the GPS status indicators are yellow or red, the selected location of the dock is NOT appropriate. Please change the dock location such that the GPS antennas have a clearer visibility.
On the UI, access the drop down menu on the top-left of the page, select Settings and click the Set Dock Location button. The dock location will be stored in 5-10 seconds as data is collected.
If the Base Station has been moved (and therefore been resurveyed), or if the dock has been moved to a new location, the user will need to reset the location of the dock by repeating the above instructions.
Set the Magnetic Declination of the IMU
Before using OutdoorNav Software, the MAGNETIC_DECLINATION variable must be set. This parameter is
in degrees and in ENU convention. Use the online calculator on this website to find out the magnetic
declination at your location.
https://www.magnetic-declination.com/countries.php
From this website, navigate to your city and note the decimal value given. Once the magnetic declination
of your location is determined, modify the MAGNETIC_DECLINATION environment variable in the
/etc/ros/setup.bash on the OutdoorNav Computer. Refer to Connecting to the OutdoorNav Computer for
details on connecting to the OutdoorNav Computer. Then execute the following command to open the required
file:
sudo nano /etc/ros/setup.bash
Once the file has been opened, find the line that exports the MAGNETIC_DECLINATION variable and modify its
value. Once done, use ctrl+x to close and save your changes. Next reboot the robot using sudo reboot.
commands:
To make sure that your changes have been applied, echo the value of MAGNETIC_DECLINATION and make sure
it has the correct value.
echo $MAGNETIC_DECLINATION
Checking GPS RTK Fix
Each time the UGV has been powered up (or moved from a GPS-denied environment to a GPS-available environment),
let the UGV sit in this position for 2 minutes to acquire an RTK GPS fix. The POS (position) and
DIR (heading) GPS status indicators on the UI should be green: .
If the GPS status indicators are yellow or red, the selected location does not have an adequate GPS signal. Move the UGV such that the GPS antennas have a clearer visibility.
If using Switft Navigation Duros and/or a Clearpath Robotics Base Station, each of these will have a solid blue LED on all of them when the RTK GPS fix is acquired..
Recording a Rosbag
If you need to perform a quick rosbag recording from the UI you can do so by navigating to the Settings dropdown in the hamburger menu and select
‘Start rosbag recording’. This will record a rosbag of the following topics (or all the topics in the namespace if followed by a /*):
rosout_agg/*
rosout
twist_marker_server/*
localization_helper/*
localization_core/*
navigation/*
piksi_position/*
piksi_heading/*
To stop the recording navigate to the Settings drop down and select “Stop rosbag recording”. This will save the rosbag with the date and time as its file name in the onav_log/rosbag_data folder.
Subsequent Sections
The following sections of this manual will outline the instructions for different tasks that can be accomplished while operating the UGV.
Web User Interface:
Overview of the Web UI components as well as the available views and icons/buttons associated with them.
Overview of the buttons required to operate the UGV in Manual Mode (teleoperation).
Instructions to send the UGV on autonomous navigation missions, including:
Adding Waypoints to the map
Creating missions
Viewing and updating missions
Adding task to missions, such as Move PTZ camera, Save Image, Dock/Undock UGV, and Wait.
Start/Stop/Pause missions
Description of the docking procedures allowing the user to dock and undock the UGV autonomously. Recovery instructions are also described.
Application Programming Interface: Details on how to control the UGV programmatically.
Navigation Details on the software used for autonomous navigation.
Simulation: Details on how to simulate autonomous operation of the UGV.
FAQs: A list of frequently asked questions.