Driving the Robot
IndoorNav offers several different methods to drive the robot, in addition to using the included game controller,
interactive markers in Rviz, or publishing directly to /cmd_vel.
Warning
CAUTION! Failure to follow these instructions may result in MINOR or MODERATE INJURY or DAMAGE to the system or property.
Warning
IMPACT HAZARD! Always maintain a safe distance from a robot in operation. A robot being operated in manual mode should only be operated by personnel who have been trained and authorized according to the standards of the facility in which the robot is in use. Be aware of the Emergency Stop button locations.
Driving the Robot in Manual Mode
See also
See detailed documentation on manual driving for more information.
The Web GUI allows teleoperation of the robot without using the included game controller. To enable manual driving, select either the Drive or Facility tab and use the on-screen controls in the lower-right corner, as shown in the figure below. Moving the virtual joystick up/down will drive the robot forward/backward, and moving it left/right will make the robot turn.
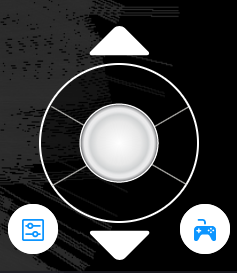
The first time you access the Web GUI after powering-on the robot, the robot may be in neutral. Click the  button to take the robot out of neutral.
Clicking the  will open the drive
settings, allowing you to adjust the robot’s driving speed or disable manual driving, shown in the figure below.
will open the drive
settings, allowing you to adjust the robot’s driving speed or disable manual driving, shown in the figure below.

Driving the Robot in Autonomous Mode
See also
See detailed documentation on autonomous driving for more information.
To drive the robot in autonomous mode the steps are:
Create a map. See Making a Map for details.
Confirm that the Manual toggle is disabled and manual driving mode is OFF. When disabled, the Drive Mode toggle is gray and a Move button will be displayed.
Select Move.
Select the location on the map to which the robot should drive. The joystick button will turn green and the orientation circle will be displayed at the selected location on the map.
Move the green line inside the orientation circle to define the direction in which the front of the robot should be directed when it stops at the selected location.
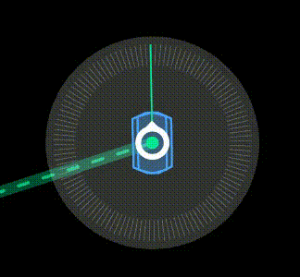
Select Go to send the robot on its way. Select Stop to stop the robot at any time.
Driving Using Endpoints
See also
See detailed documentation on driving using endpoints for more information.
To drive the robot using endpoints the steps are:
Create a map. See Making a Map for details.
Add Endpoints to the map. See Adding Endpoints for details.
Select an Endpoint.
Select Go to send the robot on its way. Select Stop to stop the robot at any time.